
The Form Assistants are useful tools that guide you through the process of creating a particular EDGAR form. When you add a software launcher to your Dashboard, any Form Assistants that are available for that software will also have buttons added to your Dashboard. These buttons will launch the software and automatically begin the process of creating a new submission for the selected EDGAR form type.
The image below is the software launcher for the Section 16 software.
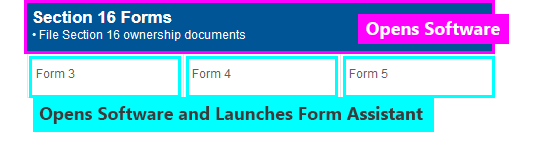
The Section 16 software has three Form Assistants:
- The Form 3 Assistant guides you through the process of creating a 3 or 3/A submission.
- The Form 4 Assistant guides you through the process of creating a 4 or 4/A submission.
- The Form 5 Assistant guides you through the process of creating a 5 or 5/A submission.
The process for using these assistants is the same. To create a new 5 filing using the Form 5 Assistant:
- Add the Section 16 software launcher to your Dashboard, if you have not already done so.
- Click on the Form 5 button.
- In the dialog that appears, set all of the pertinent information.
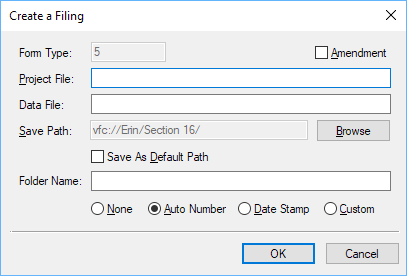
Amendment Check if your submission is a 5/A filing. Leave unchecked for a 5 filing. Project File Enter the name you want to use for your submission. This should be an EDGAR compliant submission name. Data File Enter the filename of a document to use as your ownership document. This field will be automatically filled with a new file name, based on the data you enter as your submission name. If you have an ownership document you want to use for your filing or as a basis for your filing, you can import that data later. Save Path Enter the location you wish to create the filing. By default, this location is your Section 16 folder on your Virtual File Cloud. Folder Name If you choose a folder option other than None, you can save your filing in a subfolder created specifically for your submission. You can set a Folder Name and then have the assistant auto number the folders or add a date stamp automatically. - Press the OK button to create your submission.

Helpful Hints:
- You can set default filer information in your Preferences on the GoFiler Online portal. This information will be added to your Form 5 submission automatically in the Filer Information when you create a new project using the Form Assistant.
- The Form 5 Assistant creates a blank submission with a blank ownership document. Learn how to use your own ownership document for your filing.
