The ATS-N editing tools are very simple to use. The majority of the form (which consists of item numbers, questions and instructions) cannot be edited. The editable areas on the form (data fields or fields) are typically denoted by a black border. You can click on fields to select them. When a field is selected, it will have a dashed border. For ATS-N submissions, there are a number of different types of fields.
Standard Data Field
A Standard Data field is denoted by a simple black border. These fields contain textual data. You can edit a standard field by clicking on the field and typing. Double-clicking on a field will place the cursor inside the field. Once the cursor is located inside of the field, you can edit it using standard keyboard conventions, including the Copy and Paste functions.

Most Standard Data fields have labels in blue that are located either directly above the field (as shown in the left example) or directly to the left of the field (as shown in the right example).
Checkbox Field
A Checkbox field looks like a small square with a black border. Typically, the text of the item to which the Checkbox field applies appears immediately to the right of the square. Clicking on the square will place a check mark inside the square. Clicking on a Checkbox field that has a check mark inside it already will remove the check mark. To signify that a field is applicable to you, click on the Checkbox field to place a check mark inside of it. Leaving a Checkbox field empty means that that item does not apply.

Drop-down Menu Field or Pick List Field
The Drop-down Menu field looks like a standard field with an arrow button contained inside of it along the left side of the field. These fields contain predetermined answers in a menu that appears when you click on the button. The answers available in the menu are supplied by the SEC's technical specification for the ATS-N form. All of the Drop-down Menu fields for the ATS-N submissions contain "Yes" and "No" as possible answers.

Buttons
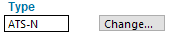
Though not technically fields, there is a button on the ATS-N form that you can click. Buttons open up dialogs to allow you to change settings or perform complex actions. The only button on the ATS-N submission is the "Change" button next to the Form Type field. Clicking this button will allow you to change the EDGAR form type of your ATS-N submission.
Editing the Submission
The ATS-N form has a number of large data fields. It consists primarily of Yes/No questions, the responses of which determine whether additional narrative information must be provided. When you choose an answer to a question, other fields may appear.
Fields that must be answered in order for EDGAR to accept your submission appear in red. The images above show examples of both required fields and optional fields. Optional fields will have a white background. Note that some fields may become required based on your responses to certain items. Also keep in mind that the on-screen highlighting provides guidance. You should always validate your submission prior to filing to ensure that all of the required fields have been answered. Proofing your submission so reviewers can go over your responses is also an important step prior to filing to minimize the chance of errors in your filing.
For each item of the ATS-N form:
- Select the appropriate "Yes" or "No" response. For items that are not questions, enter data into the field by clicking on the field and typing.
- If an item requires an explanation of your response, you can click on the field and author your response inside of the field. When authoring a response inside of a Standard Data field, remember pressing the "Enter" key will enter the data into the field. It will not place a line return or paragraph space into the field.
- Alternatively, you can copy an explanation from an external document and paste it into the field by using the Paste command. You can paste over the entire contents of a field by selecting the field before using the Paste command, or you can use paste inside the field to insert additional data by double-clicking on the field, positioning the cursor in the desired location and using the Paste command.
- Add any required exhibit files.
- Save the submission at any time using the Save command.
Helpful Hints:
- The SEC requires that certain data fields contain only a specified number of characters. When the cursor is located inside a field, the Status bar of the application tells you how many characters are left for that field. Excess characters can be inserted into a field, but when you save the submission, those characters will be lost.
- Although large amounts of textual data may be entered into standard fields, the SEC does not allow formatting including the use of line returns and tabs. This may make authoring responses difficult inside the form fields.
- Always remember to use the Validate function to check your submission for errors.
